Monday, 11 May 2015

Research

The Destruction of Sodom and Gomorrah, John Martin, 1852. 
When I start a project I like to create a pinboard on pinterest and gather together research constantly and actively. Sometimes I like to sit in bed and find research images.


When I first made my afterlife pinboard for this project the very first thing I added was 'The Destruction of Sodom and Gomorrah' By John Martin. I have seen this painting in person and it brought out very strong feelings in me. To start with, the painting is over a metre and a half wide meaning that the scale sucks you in and takes up your vision. The blurry swooshing fire casts down from the engulfing violet clouds. And from these clouds strikes a bold glowing lightening bolt. This is an image of gods fury and vengeance. An image of a fire and brimstone old testament god. An image of hell on earth .
This is what happens to sinners, folks!
I want to add something to this image. I'm just not sure what to add yet.

Last week when I was paper Marbling, I decided to try and emulate the colour and feeling of inferno in John Martin's painting:

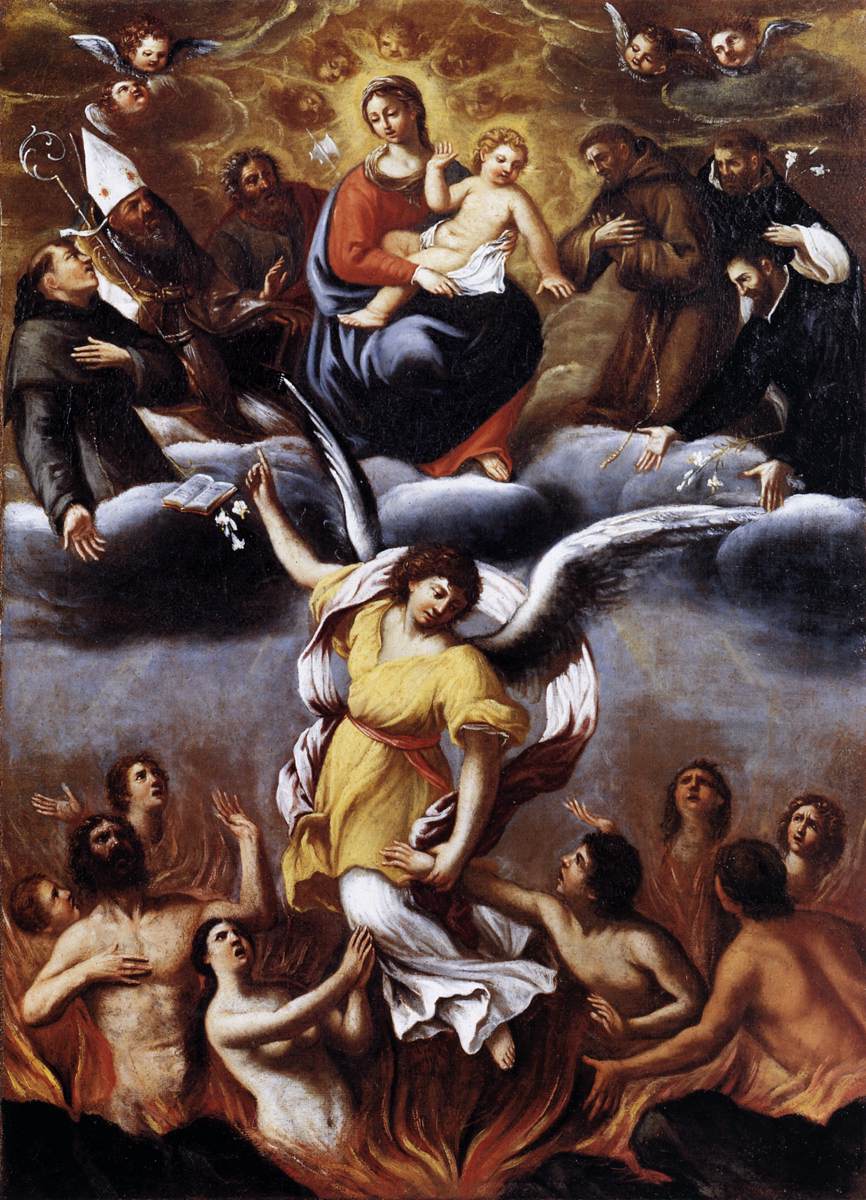
I looked at other traditional Christian paintings such as 'An Angel Frees the Souls of Purgatory' by Lodovico Carracci (1610):
This depicts heaven, hell and the in-between. 
Angels feature in art of the afterlife quite a lot. I especially like Gustav Dore's etchings of angels for Dante's Divine Comedy. I was shown these by one of our teachers, Chris.
'The hosts of heaven' (1868) 
Lucifer falling from heaven. 
As I said above, these images are inspired by Dante's Divine Comedy, an epic poem by Dante Alighieri, begun c. 1308 and completed 1320.
I will talk about this more in another blog post.


Other religious art I have looked at includes depictions of Ragnarok- the old norse doomsday where the gods and half of the dead warriors, lead by Odin, face off against the forces of evil. It is foretold that Surtr will engulf the earth in flame leaving no life except for one man and one woman.
'Battle of the Doomed Gods' -Friedrich Wilhelm Heine (1882) 
The couple left to repopulate the world is Líf- the feminine name for life and Lífþrasir- masculine, translating to 'lover of life'. I love how this ties together Christian ideas of doomsday and Adam and Eve; the Stories of the end and the beginning of the world. This alludes to a cycle that goes on forever.

The last bit of research that I'm going to stick on this blogpost is Buddhist. Mandalas are very popular in Buddhism, monks will spend days pouring out coloured sand into huge intricate patterns that represent concepts such as night, day, life, death as well as the three realms of afterlife they believe in.

'Thangka' aka the wheel of life.
The central 3 animals represent Greed (pig), Hatred (snake) and Lust (cock).I think that Buddhists are very cool and appreciate their use of bright colour and radial-based art. I once read all about their ideas of extra planes that one could ascend to after life but it is too much to write down here right now. I might look it up again and see if it could inspire my work.


I lied, I'm going to throw one more image in that I've been researching; Baphomet, the Sabbatic goat;
By Yuri Leitch. Original icon by Eliphas Levi.
Baphomet represents man, woman, good, evil, life and death. Baphomet represents the sum total of everything. It was an idol supposedly worshipped by the Knights Templar but since then it has been used by occultists such as Szandor LaVey, the infamous author of the satanic bible.


Once again, I don't really have enough time to go into the details of these books (it's 1am and I have college tomorrow!) but you can read about them here and here. The satanic bible is 'composed of four books: The Book of Satan, The Book of Lucifer, The Book of Belial, and The Book of Leviathan. The Book of Satan challenges the Ten Commandments and the Golden Rule, and promotes hedonism. The Book of Lucifer holds most of the philosophy in The Satanic Bible, with twelve chapters discussing topics such as indulgence, love, hate, and sex. LaVey also uses the book to dispel rumours surrounding the religion. In The Book of Belial, LaVey details rituals and magic. He discusses the required mindset and focus for performing a ritual, and provides instructions for three rituals: those for sex, compassion, or destruction. The Book of Leviathan provides four invocations for Satan, lust, compassion, and destruction.' -Wikipedia page for The Satanic Bible

Well that's it for now! I'm not sure which bits of this research I'm going to develop yet so I decided to put it all up here to start with and to get my thoughts going.
Right, I'm off to bed.

Wednesday, 6 May 2015

Week 3- Hell money


In last week's blogpost, I discussed my idea to produce money for the afterlife. This idea was inspired by various things; primarily, this hell money that my mum gave to me a while ago:
This has been stuck on my wall for a few years, I don't know its origin.
I was also inspired by ancient Roman ideas of giving Charon- the ferryman of the dead, an 'Obolus' coin. This was not to pay for the passage, but to say thank you to the gods for their life.


These were my first concept designs, inspired by the hell money I had already and a tenner I had on my desk. I used crosshatching and other pen shading techniques to emulate the style of printed money. I also included floral motifs, the ouroboros symbol and skeletons. 'Exanimus Expensum' means 'Death cost' in Latin and the asian characters are taken from the original hell money.
From these experiments, I produced a final Heads and tails design:


I really like what I made and feel that I pulled my favourite parts from the first designs well.
The next step was to print this out a few times but with the front and back printed on opposite sides.


Initially, I wanted to print them on special paper that felt like money but college had no paper like that unfortunately. So I decided to add a green paper texture to the notes in Photoshop and then printed them on paper in the reprographics department. The ink left the paper feeling glossy and un-money-like so I didn't want that. In the end I decided to print the money in black and white. I sliced them up into 24 individual notes then washed them with diluted watercolour on both sides. This left the notes soggy and malleable allowing me to screw them up, tear them and generally weather them.

I'm very chuffed with how these came out! They look quite authentic to me. My classmates enjoyed throwing them about. I think it's a good sign when your classmates are interested in what you've made. I'm not sure how to present the money, I might stack them together. I'm also considering making a film or taking a series of images of myself burning the money.

Wednesday, 29 April 2015

Week 2- Developing ideas


Well the end of the second week has come (I'm actually writing this on Tuesday, whoops) and I can feel my project slowly picking up momentum. The beginnings of projects always seem to start off slow as you try to; A: Work out what your project is actually about (~week 1),
B: Find relevant and interesting research and material (~Now),
C: Decide on what you want to make (~week 3)
I suppose this feels slow as it requires lots of thinking, research and development before you even apply any practical skills. Not properly knowing what your project is seems quite common in the first few weeks, which can be a bit discerning when you only have six seeks!

Two skull studies, One from a photograph I took at the Pitt Rivers museum and the other is a scratch drawing of a rabbit skull my dad gave to me.

Anyway, This week I did quite a lot of research. I watched a TV documentary from 1979 about near death experiences, where people have been brought back from 'clinical death' and saw/experienced very curious things such as being visited by dead friends, seeing themselves from the 3rd person and an overwhelming feeling of calm.

The idea of floating about in an unfamiliar place seems quite common and is a reoccurring feature of near death experiences. It inspired me to draw a person who is not quite there, as if they are a spirit or are phazing into the afterlife. The bright swirly colours is an example of paper marbling, which I was shown by a teacher, Lizzie. I felt that the ambiguous swirling shapes represented the inconceivability of a reality beyond death. The bold, bright colours feel rather dream-like, too. I intend on combining these two images next week.

Other research included old Norse, Roman and Egyptian beliefs of deities and death.
It seems to me that a lot of civilisations have similar ideas of Heaven, Hell and the judgement that leads to them. But they are not identical by any means.

'Judgement' -(ink on paper)
An omni-present being peers into a figure's very soul to decide their eternal fate.
The Romans believe in three underworld realms- 'The Elysian Fields (a version of paradise) if you've been a warrior or hero; The Plain of Asphodel, if you've been a good citizen, where you will continue to live a good life as a shade; or — if you've really offended the gods — to Tartarus, where you'll be punished by the Furies until your debt to society is paid. (There's no "eternal damnation" in the Roman underworld, although you can be there a pretty long time, depending on what you've done.) Your punishment depends on your crime.'- Flavia Claudia on novaroma.org  I like the idea that once you've done your punishment, you get to leave hell. It seems a bit less extreme than eternity. Before they reach these realms, dead Romans have to pass the river Styx with the assistance of Charon, the ferryman. They each pay him a coin (called an Obolus) which they were buried with in their mouth. 'This payment is not representative of money so much as of the relationship between god and man, acknowledging your debt to the gods and their protection and guidance to you.'
I like the idea of death money, which travels to the under-realm with you. This seems to be a reoccurring theme- bringing money or possessions with you after death. 
The Vikings would make a band new set of clothes for a dead cheiftain then burn them along with their tools, weapons and one or two sacrifices. All of these belongings were believed to be carried up in the smoke of the fire along with the dead warrior.
I am considering making some of my own death money to take to the gave, we'll see!

In Egyptian beliefs, the dead's hearts are weighed against the 'Feather of truth'. If the heart is lighter than the feather then they go to heaven. If not they are devoured.
When researching the Egyptians even more for this blog-post I uncovered some really interesting information on what they believed happened to Pharaohs after they die, which features passing through 12 gates, battling the huge evil serpent, Apophis alongside the gods and literally turning into the sun. I fancy making some art inspired by this!

I think this week has gone well, I went to a funeral on Wednesday so that was actually quite useful to reflect on my feelings on death directly. I feel I've been pursuing research and developing ideas with notes and sketches rather well. Next week I'd like to make a series of ink drawings on marbled paper and I would like to produce some Underworld currency.


Monday, 20 April 2015

Self directed project- 'Hereafter' Week 1


It's a new term, it's a new project! This time it's self directed!
Before the Easter holidays, we went on an educational visit to the Pitt rivers museum in Oxford. The Museum holds a huge collection of artifacts but presents them in a unique way; rather than grouping objects together according to their date or country of origin, objects are presented by theme. So, in the jewellery case there were rings from every civilisation imaginable- bronze age to modern day, assyrian to viking. The whole museum is presented in this fashion from shoes to amulets, bows to ceramics, coins to body art.


The things that caught my eye the most were Amulets and other magic charms, cultural patterns, Minerals and crystals. But I really liked the skulls and the skeletons! I spent quite a lot of my time in the museum sketching various skulls:


There were 'skulls of enemies'- bound by twine, impaled on spikes, etc and 'skulls of heroes'- decorated with feathers or decorative stones. I found this value in death interesting. If the tribesmen didn't believe in some form of afterlife, they wouldn't have reason to do this with the skulls of dead men. So why? And what do they believe happens after death?
A painting depicting purgatory by Annibale Carracci
This is what I decided to base my project on; the afterlife.
I'm interested in different cultures' approaches to the afterlife and their art depicting it. I am also very interested in exploring and developing my own thoughts and feelings on the subject matter.
You can read my whole project proposal here.

I chose this theme because I thought that it has a large potential for imagery and big questions. I also knew that I would find the theme challenging, which is exactly what I was looking for. 

Lino prints in silver and white.

The first week is usually spent getting into the groove of a project, starting with research (which can be seen on my afterlife pinterest board). I also got a few books from college about burials. I also produced a few small paintings, prints and illustrations to kick-start my development of ideas.

Right: photograph of a mass grave in 'Tombs, Graves & Mummies' by Paul G. Bahn
Left: My illustration inspired by the photo
Next week, I'm not entirely sure about what I want to do. I'm definitely going to make more pen and ink drawings because I've been enjoying that and took some ink home to make more drawings. We'll see how it goes!

Sunday, 19 April 2015

4D project finished

A few weeks ago we started on a mini-project at college based on moving image. Each group was tasked with producing a time-based piece, weather it was a flipbook, film or even a thaumatrope. This is what my group finished with:


I'm pretty chuffed with what we produced considering the constraints forced upon us. But before I delve into critical evaluation, I'm going to take you through the process that lead to the creation of this film.


Mindmaps <3
We started with a mind map- obviously. A few ideas were thrown around for how we could make a time based sequence of images/film, including a time-lapse or hyper-lapse which is a film of something slow i.e: trees growing, the sun & moon, building construction sped up very fast until the slow movements are perceivable at a human speed. The other idea was to make a stop motion animation of the equipment around college brought to life. We chose the second idea because College didn't have the equipment required to make a time-lapse and making a film in the art department felt more personal.
I had already researched a stop-motion artist named Pes who I find quite inspiring. My mum and I saw his degree piece, 'western spaghetti' in Birmingham in 2008 which definitely helped inspire ten-year-old me to produce 'Ninja: Diabolo', an animation about a diaboloing ninja:


Anyway, back to the current project at hand. We looked at videos by Pes and a few other animators, we really liked an animated TV series, 'Ooglies' that was on CBBC. I produced this slideshow of film techniques and inspirations. I had an idea in my head of what I wanted the film to look like. It would start with a shot of a light switch, someone would walk past, turn it off and shut the door. Then, slowly objects like paintbrushes start rattling about faster and faster until they all pop into motion and all start organising themselves upon the work surface. The film would then consist of various short scenes that show things around college such as Vices, easels, paper guillotines (see drawings on mind map above) bursting into life until someone comes back into the classroom because they left something and all the objects drop to the floor. I started a storyboard for this plan:

I didn't have the opportunity to finish this because we decided to just make what we could for the film. We were all given only two mornings to make the whole thing. Minnie and I set up a camera on a tripod and decided the first thing we'd animate would be the paper cutter.
I assumed the role of the animator- I would incrementally move the cutting head, step back then ask Minnie- the camerawoman to take a photo.  We had the camera set to Manual mode and manual focus so that the settings don't change during the film. The cameras usually shoot images that are 5184 x 3456px. This is huge and very difficult for a computer to process into a film (537,477,120 pixels per second). HD film is only 1920x1080 so we changed the camera to take the photos only that size (58,680 p/s).

'shwoosh, shwoosh, shwoosh!'
We managed to produce a few animations like this one, but not as many as I would have liked to have made. I also wanted audio to accompany the film. Foley is very important for pulling a film together and can have a huge effect. Pes, mentioned earlier, has beautiful, crisp foley accompanying his films which really seals the deal. Sadly, we had to be realistic and made what we could in the time given, this meant actually producing the film and not worrying too much about extra parts & details. I then edited all the parts together using photoshop and adobe premiere pro over the Easter holidays.
Right, now, you might want to watch it again and then we'll move on to the self evaluation.


As I said at the beginning, I'm still very pleased with what Minnie and myself achieved and feel that if we were asked to make this film again but were given more time, we'd make a rather professional looking film. I already knew quite a lot about animation but I definitely learned even more during this project and that's very important. 

Sunday, 22 March 2015

Analog(ue?) Photography


Last week we were introduced to the college's analog cameras for the first time! I was well excited. I've been using my mum's DSLR for a few years now and feel quite comfortable with a camera but I've never actually had a go with a film one (after an incident where I ruined all of my family's millenium photos out when I was 2..  we don't talk about that.).


A 'Contact sheet' made of many film negatives from the camera.
This is just like the the thumbnails of photos on your computer!
In the first week we took photos around the college grounds then developed them like the photograms we made. This left us with a long developed film waiting to be turned into a contact sheet which we then did earlier this week. This involved sandwiching the negatives between photosensitive paper and glass then shining light through to get a small version of all the photos. 
'Pityas and Daffodil' -I joked that thic could be in a fashion magazine then realised it really could be.
A few days ago we went out to take portrait photographs of classmates in different lighting then we got to enlarge them to a proper photo size. I really really enjoyed this process in the dark room. I definitely want to do this again!


I think that this photograph of my classmate, Pityas is actually beautiful. The white light and the way his jumper seems to glow gives him and almost angellic feeling. The soft focus on the tree behind him turned out brilliantly in my opinion. I am honestly considering sending this photo to a modelling agency for Pityas. He has the 'model look' perfected!
And finally, here's a dramatic photo of myself, taken by Pityas (who's not just a nice face)

I must admit I like the scratches and marks left from the processing of the photo.
Ultimately, I had a really good time and learnt a lot. Which is what matters. I definitely want to do more of this.

Photograms


Two of these are by Man-ray, one is by me.
I thought they looked good together, can you tell which is mine?
 We did photograms a few weeks ago now. Photograms are made in the dark room by projecting light onto photosensitive paper then developing the paper. The shadows caused by objects places on the paper stay white. Areas where the light hit the paper turn out black.

First, we made test strips by exposing the paper to two seconds of light then slightly covering it, exposing it for another two seconds and repeating along the strip. What should come out is a strip with about 5 or 6 obvious shades of monochrome. What I got was mostly black. We repeated the process but with only 0.5 seconds of exposure time per covering. That turned out very well! Sing the test strip we could tell that three to four seconds was the perfect exposure time to get a perfect black.


Various experiments using various objects including glass prisms and a slide carousel for a projector.
I really love how crisply the stripes in the top two images turned out.
We started getting creatively instantly when allowed to make our own photograms! The Dark room has a very exciting feel to it with the dark lights, projectors and chemicals that makes photographs magically appear a bit like Harry Potter. We photogrammed whatever we could get our hands on; Photography equipment, light bulbs, other classmate's glasses, even our own hands!
Once again, I've mixed together my own work and that of Man-Ray and László Moholy-Nagy.
This time, there's a theme of stripes!
The process is hugely experimental, quick and very gratifying, I find. It is no wonder surrealist artists such as Man-Ray jumped on it to start producing ambiguous monochrome arrangements out of household objects. I can definitely see myself wanting to do this process again in the future!