Showing posts with label color. Show all posts

Monday, 23 February 2015

Light Painting

Lena and myself discovering the wonders of light painting.

I went to a light painting workshop about four years ago and had a blast. It involves setting up a camera on a tripod set to a long exposure. You then have to use a torch or preferred light source to draw in space. Your movements over time with the light are then captured by the camera and turned into an image.


An animation of a classmate, scott, electrocuting Iona. You can see the blur that is me in the background.

So at college, you can imagine I was excited to hear I would have the opportunity to experiment with long exposure light drawing once again. We have five weeks to develop our ideas like in the 3D rotation.


A 'failed' and 'successful' long exposure photograph. This depends on your oppinion, though.
This is art, of course!
So our class was divided into groups and our photography teacher, Richard, walked us through the settings needed to obtain a good light painting image. This required the camera in Manual mode so that we could change the shutter speed (1s-30s) and the Aperture (~F4.0) independently. The iso was at 100 and the lens was set to manual focus.
By fiddling around with these you can get different outcomes. In the above image, the top photo was out of focus and had too low an F number. You can see how much better the second image was after we rectified these issues.


So then we experimented, of course! The light in these images was from an iPhone torch shining through come coloured cellophane. The camera speed was set to about 7 seconds; enough time to walk quickly around your subject, wobbling a light about.
I really love the way these three photos turned out! The colour is vibrant and the long exposure gives a kinda creepy feeling to the images. A friend of mine said these look like an alien abduction, I like that!


I made an animation out of multiple photos of this pose with the line different in each of them. You can see that at the beginning of this blog post.
I am excited to see where how we can develop this technique further and will discuss those outcomes in the future.


Saturday, 31 January 2015

What am I going to make?


About a week ago now we were told that we should have some kind of idea of what we'd like to make this term with the theme of light. So what did I do?
I drew a damn mind map of course!

The damn mind map. Click to expand.

 The mind map didn't actually get very far. I consdiered some kind of mobile with lenses and crystals hanging from it so that they would refract light that hits them, a bit like the crystals I have hanging in front of my window that fill my bedroom with rainbows most mornings and bright days:

A sunset viewed through one of my crystals.
I thought a mobile could be good, even another classmate suggested it to me. It would also fulfill our unit about problem solving as balancing different weighted objects would be quite hard.
The other idea I had on my moodboard- the one you can tell I went for because it's slap bang in the middle, was to hold some kind of light installation. I'd experimented with light in a store room a week before and I'd really enjoyed the ephemeral and performative elements of what I'd done. My mum has also taken me to quite a few exhibitions in my life and I've always enjoyed and been interested in gallery installations.


'Line describing a cone' - Anthony Mccall

So I wanted to make an installation? Yes!
I had a kind of idea in my head of what I wanted; hanging lenses,  projectors, movement.
How was I going to do these things? Well I have a few lenses already, maybe I could suspend them somehow. I chatted to Young, a tutor again and we drew up a design to build a frame for a lens of mine to suspend it from.
I'm about to write a WHOLE blog post about this thing.
So what else am I going to incorporate into my installation? I could use the things I've been experimenting with already; Projector, overhead projector, card with lasercut holes, dancing people. Dancing people! I really like dancing people. I love the 2D shadows made by moving people and the human interaction with the light.
Classmate Lena and myself gettin' down n' funky before some overhead experiments.
Now, I haven't really planned any more than this so far and the 3D part of the theme of light ends next week. I probably won't be able to make a whole finished thing but I'll have some proofs of concept, some photos, and quite a lot of experience by the end of this!


Wednesday, 28 January 2015

Unconsious Inspiration

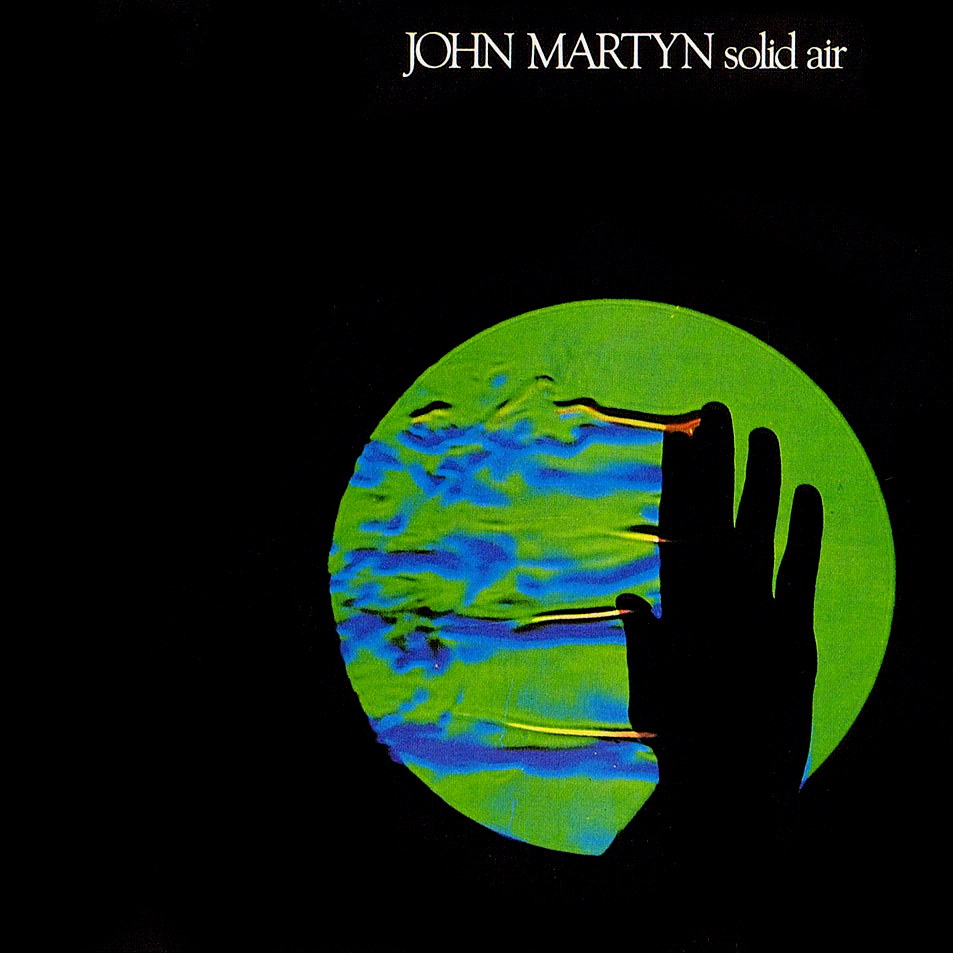
Inspiration can come from everywhere! I've noticed that a few of my photographs look visually similar to the cover of Solid Air by John Martyn. My dad had this album in his vinyl collection and I used to enjoy getting all the gate folds out and looking at the artwork on them.


I searched for the artist who made this iconic art but to no avail. I did, however, find out the technique used to capture the image; Schlieren photography, a form of Shadowgraph photography. I would love to try this form of photography some time.


This photo was taken last week as part of my experimentations with a few classmates. When I saw this photo later on, I was instantly reminded of solid air. Was this unconsious inspiration or just chance?


This is a photo I took almost a year ago now, not only does it make me think of multi dimensional beings communicating with us but it also features a hand silhouette. Funnily enough, quite a few people have likened this photo to Solid Air also.

Tuesday, 27 January 2015

Experimentation 20.01-26.01


Yesterday I set up a crude little make-shift studio in one of my college's store cupboards. I had a little white strip of paper between two shelves. Occasionally people would come into this very cramped room to fetch something (in the dark), they would ususally look at me a bit funny.

My Suitcase scale studio! Note the art materials overflowing from the shelf above.
Using a lens, I was able to focus the light coming through the triangular apertures in the lasercut card onto my paper backdrop / projection screen.


And then I experimented further..


I even filmed some bits using a tripod. I quite enjoy projecting onto my body, later on in the week I experimented with dancing and full body movement in front of projections.

A gif I made of projecting onto my hand.

The next day, my class had self directed study. I'd left my projector and lenses and kit in college so I got some classmates involved! We had an entire classroom to utilise this time and so the projection was on a larger, more human scale;


Myself dancing in front of the projector and Lena interacting with the shadows of my fingers. This had quite a theatrical, performative feeling. Like multi dimensional shadow puppets.
Multi-layered Hand dancing along to music. I'd love to choreograph some kind of light performance/dance along to music. Or to maybe even make a music video based on these premises!
We used cellophane as colour gels to tint the projector light and experimented with focus, distance and perspective. In the end, we had about five people dancing in the shifting light whose shadows interacted on a 2D plane, it was really fun! I have a video of it which I will upload at some point.

A few days later, on my birthday, we had another self directed study. So what did we do? We had another light show of course! This time, I found an overhead projector, which is designed to focus anything on its surface, perfect!

Using the overhead projector and my (possibly stolen) green man sign.

We learnt as much as we had fun, which is the beauty of experimentation.


Tuesday, 20 January 2015

Artist inspiration: Mariah Robertson


At college we were given a big list of artists we should look into, one of those artists was Mariah Robertson. I instantly liked Mariah's vibrant but dark images.

  
Gladiola Window RGB #3 & #1 [2007]

I could tell that Mariah has somehow manipulated the Red, Green and Blue layers of her image. There might be a technique to do this in photochemical processing but I knew this effect was also possible through Photoshop.

Here is my attempt made from a photo I took today while expreimenting in Young's class:


In fact, I am rather well aquainted with playing with the three colour 'channels' of an image.
I've used it in graphic design:


I entered this design to be printed on a t-shirt. Sadly I didn't win the competition. I'd like to try screen printing this some time maybe. This imsage was made along the same premise of every image on this blog.


A profile picture of mine and a concept album cover for a friend's band; Tescos Chainstore Massacre.

The two images above were made by warping the colour channels rather than rotating them.


A publicity photo of Chris James, musician and a maths based graphic design made by me.

Rather than being rotated or warped, the colour channels in these images have been scaled subtley to give a red and blue edge to images. This mimics the refraction of light through a lens as white light is split into the colour spectrum. Red and blue are at opposing sides of the spectrum.